Projector Blog : How do I display my windows laptop on my projector?
How to connect you Windows laptop or tablet to a projector with a cable
A wired connection is still the most reliable and best quality way to connect to a projector. It is also the quickest if you have visiting presenters as there is no software to be installed, just plug in a cable and away you go. Most windows laptops will have a VGA or HDMI port. Where available we recommend using HDMI as this uses a digital signal resulting in a sharper more detailed image.
Steps to setup a wired connection between your laptop and projector:
- Connect the HDMI or VGA cable to the projector and laptop/tablet.
- Turn on your projector. Windows at this stage should recognise the connected projector.
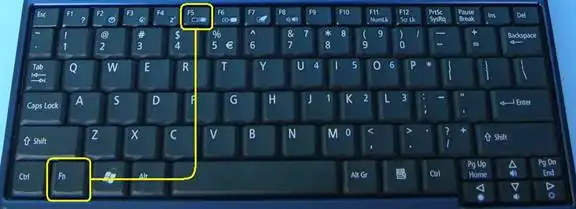
- If the projector does not immediately display an image, press and hold down the Fn key and then tap the Display Toggle key to select the type of display. The display Toggle key is usually an F key on the keyboard, it will have an image of a computer monitor or square on it. Some keyboards have it has F5 some F2 however it varies between brands.
- Pressing the Display Toggle F key over and over will change the display from
CLONE (copies your laptop screen onto the projector),
PROJECTOR/MONITOR ONLY (turns off the laptop screen and displays only on the projector),
EXTENDED (the projector acts as a 2nd monitor so you can drag items off your laptop screen for them to appear on the projector).
Using the Projector Only selection is recommended. Some computers do not have the processing power to display on both projector and laptop at the same time without having performance issues. If your projector has a different resolution than your laptop screen you can also encounter display trouble... selecting Projector Only should correct this.